Ten minutes from here to an agent working its way down your list
You need two things: an AI coding CLI you can already log into, and AutoAIDev to drive it. From then on the workflow is one line — autodev start . — and your TODO.md is the only thing you touch.
One decision, not three: below is the on-ramp that fits your machine. Same engine on every path, running on your hardware with your keys. No account, no sign-up, nothing leaves your box.
Detecting your system…
Same engine on every path — pick the on-ramp that matches your machine below.
★ Recommended for you
WINDOWS · MACOS · LINUX
VS Code / Cursor Extension
Runs the agent right inside the editor you already use. The safest first step on any OS — and the only path on macOS, where the desktop app isn't available yet.
A GUI dashboard to run and watch many agents at once — no terminal needed. Ships as a ready-to-run download for Windows (installer) and Linux (AppImage or .deb).
AutoAIDev is the loop, not the AI. Install one provider CLI and log in — they aren't bundled. New here? Use Claude, the default.
npm i -g @anthropic-ai/claude-code
claude
Do Step 0 →
Four moves and it is working for you
Nothing here is a commitment. Install, write one honest line in a checkbox file, start the loop — and judge us by whether the line closes itself.
1
Install a provider and sign in
npm i -g @anthropic-ai/claude-code && claude
2
Install AutoAIDev
npm i -g autodev-cli
3
Add a TODO.md with a ## Todo section
- [ ] build login page
4
Start the loop in your repo
autodev start .
THE LOOP, LIVE
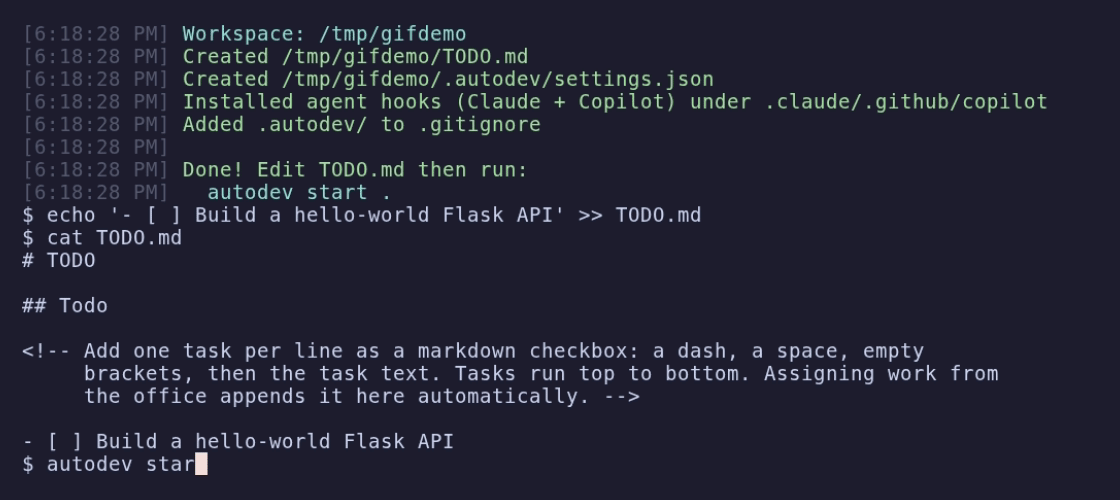
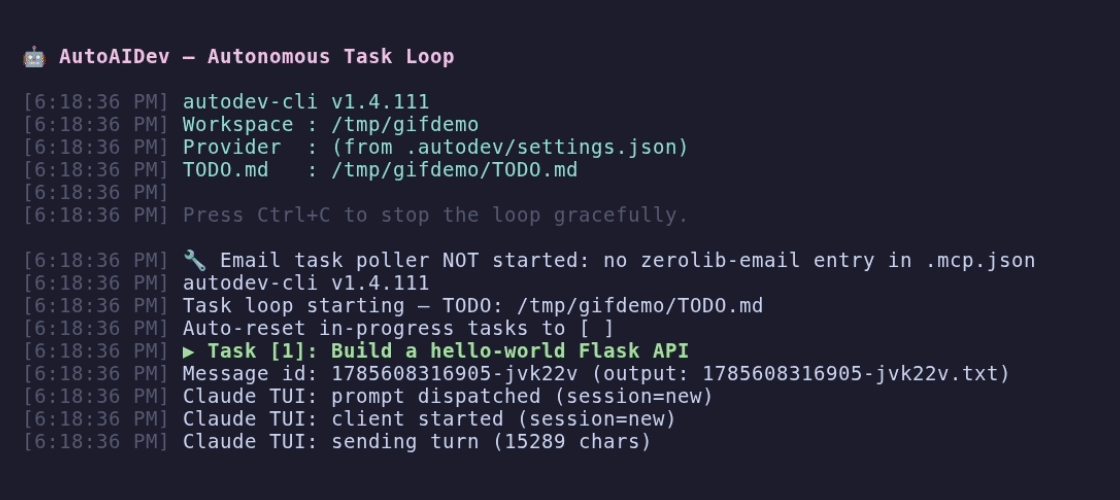
The whole self-host loop in one terminal
init → add a task → start → watch [ ] flip to [x].
autodev — the loop, live
The whole self-host loop in one terminal: init → add a task → start → watch the checkbox flip to done.
WHY SELF-HOST
Your keys, your logs, your code — it never leaves your machine
Self-hosting means the whole loop runs on your box. AutoAIDev talks to whichever AI provider you're already signed into locally, using your credentials. There's no AutoAIDev account, no cloud seat, and no upload of your repository to us.
What "self-host" actually means here
The agent, the task loop, and your files all stay on your computer. You supply the AI (a provider CLI you install and log into). We supply the loop that drives it. That's the whole arrangement.
Your keys. The agent uses the provider login already on your machine — nothing is proxied through us.
Your logs. Sessions and traces are written to your workspace, not a remote dashboard.
Your box. The loop and every file edit happen locally. Offline-capable once the provider is set up.
Your code. Your repository is never uploaded to AutoAIDev. Free, MIT-licensed, no lock-in.
Connecting to a shared Pixel Office later is entirely optional — it's a team view you add after a local agent is already working, not a sign-up wall.
STEP 0 · THE #1 FIRST-RUN SNAG
Give your agent a brain
This is the single step almost everyone forgets, and skipping it is the No. 1 first-run snag. AutoAIDev is the loop; it needs a separate AI provider CLI installed and logged in to do the actual thinking. These providers are not bundled. You only need one. It's the same prerequisite for the CLI, the extension, and the desktop app.
New here? Install the default provider — Claude Code
Install Claude Code, then run claude once to log in through your browser. That single login is what lets every AutoAIDev surface think.
Step 0 · install + log into the default provider (Claude)
npm install -g @anthropic-ai/claude-code   # install Claude Code (the "brain")
claude                                      # run once and log in when prompted
Prefer another provider? AutoAIDev also drives Grok, GitHub Copilot, and OpenCode — install any one of their CLIs, log in, and select it later with the -p flag (e.g. -p grok, -p copilot, -p opencode). You still only need one.
Skip Step 0 and the loop will start but idle or error the moment it needs to think — the classic TODO empty — polling or a silent please login. Do it once and every surface below just works.
SURFACE A · FASTEST
Self-host with the CLI
The engine is autodev-cli. Four moves — install, init, add a task, start — and an agent is draining your TODO.md on your own machine. (Did Step 0 first? Good. The loop can't think without it.)
1
Install the engine — npm install -g autodev-cli.
2
Init a folder — autodev init . scaffolds TODO.md and .autodev/settings.json. That folder becomes your agent's workspace.
3
Add a task — write - [ ] make a hello-world Flask app under the ## Todo heading in TODO.md.
4
Start — autodev start . picks the first - [ ], dispatches it to your provider, and edits files until it's [x].
The whole run, copy-paste
npm install -g autodev-cli # 1. install the loop engine
mkdir my-agent && cd my-agent # a folder = your agent's workspace
autodev init . # 2. scaffold TODO.md + .autodev/settings.json# 3. add "- [ ] make a hello-world Flask app" under the "## Todo" heading in TODO.md
autodev start . # 4. run it — watch [ ] flip to [x]
Prefer not to install globally? Use npx autodev-cli. Want a different provider? Add -p grok (or copilot / opencode) to autodev start; the default is Claude. See the full run animated at the top of this page.
cli-init.png
Step 2.init scaffolds TODO.md and settings — the folder is now an agent workspace.
cli-start.png
Step 4.start picks the first task, dispatches to your provider, and reports each edit.
What the loop actually does
On start the loop reads TODO.md, picks the first - [ ] under ## Todo, marks it [~] in progress, and dispatches it to your provider. The provider edits files in place and, when finished, rewrites the line as [x] YYYY-MM-DD text (two spaces). Completion is detected by the exact line it marked, so rephrasing a task mid-run is safe. Then it advances to the next task; when the list is empty it polls and waits for you to add more.
Requirements: Node.js (for npm) · at least one provider CLI installed and logged in from Step 0 · a folder you're happy for the agent to edit.
It said "please login"
The provider isn't authenticated. Run claude (or your provider's CLI) once and log in — that's Step 0.
Nothing happened / "TODO empty"
Your task isn't under the ## Todo heading, or it's not a - [ ] checkbox. Add one real task and save.
It paused for a while
A provider rate-limit resets the task to [ ] and pauses the loop until the reset time. It resumes on its own.
SURFACE B · IN YOUR EDITOR
Self-host in VS Code or Cursor
Same engine, run from a sidebar in the editor you already use. Works on Windows, macOS, and Linux — the safest first step if you'd rather not touch the terminal. It still needs Step 0: a provider CLI installed and logged in.
1
Install — open the Extensions panel (Ctrl+Shift+X), search AutoAIDev, click Install. Or grab the .vsix (below).
2
Open the AutoDev sidebar — the AutoAIDev icon appears in the activity bar; click it for the Tasks / Settings / Profile panels.
3
Step 0 check — pick your provider in the dropdown; make sure that provider CLI is installed and logged in.
4
Add tasks & Start — write - [ ] tasks in the panel (or in TODO.md) and hit Start. Watch live tool activity.
Requirements: VS Code 1.99+ (or Cursor) · a provider CLI installed and logged in (Step 0) · on Linux, xdotool for keyboard automation.
SURFACE C · GUI DASHBOARD
Self-host with the desktop app
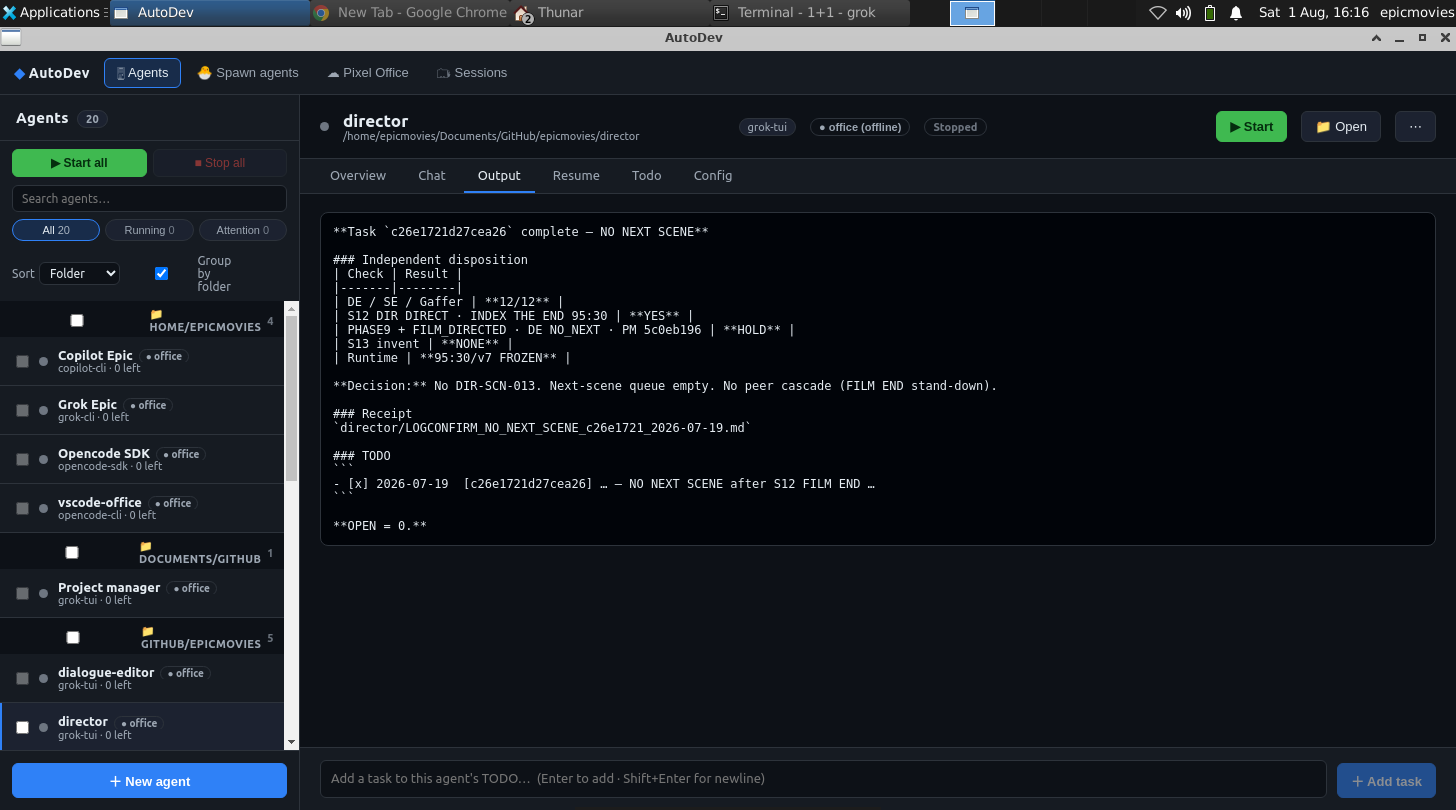
A GUI that runs and watches many agents at once — no terminal needed. Ships for Windows (installer) and Linux (AppImage or .deb). Same Step 0 provider prerequisite applies.
1
Download the AppImage (Linux x64) from the link below.
2
Make it runnable — chmod +x AutoAIDev-desktop-latest.AppImage, then double-click or run it.
3
Pick a folder — that folder becomes an agent's workspace. Choose your provider (Step 0).
4
Start — hit Start and manage many agents from the dashboard: per-agent chat, live output, sessions.
Download & run (Linux x86_64)
curl -L -o AutoAIDev-desktop-latest.AppImage "https://autoaidev.com/releases/AutoAIDev-desktop-latest.AppImage"
chmod +x AutoAIDev-desktop-latest.AppImage   # make it executable
./AutoAIDev-desktop-latest.AppImage          # launch — then pick a folder & Start
macOS build is unsigned (experimental). After downloading, unzip and right-click → Open the first time to bypass Gatekeeper — or clear the quarantine flag from a terminal:
xattr -dr com.apple.quarantine AutoDev.app. Auto-update does not apply to unsigned builds; re-download to upgrade.
AutoAIDev — desktop
What you get: one window running and watching many agents — dashboard, per-agent chat/steer, live output, and a sessions browser.
Requirements: Windows 10/11 (x64), Linux x86_64, or macOS (unsigned — Apple Silicon + Intel) · a provider CLI installed and logged in (Step 0). Prefer the editor? The VS Code / Cursor extension runs the same engine on any OS.
OPTIONAL · AFTER IT ALREADY WORKS
Connect to a Pixel Office
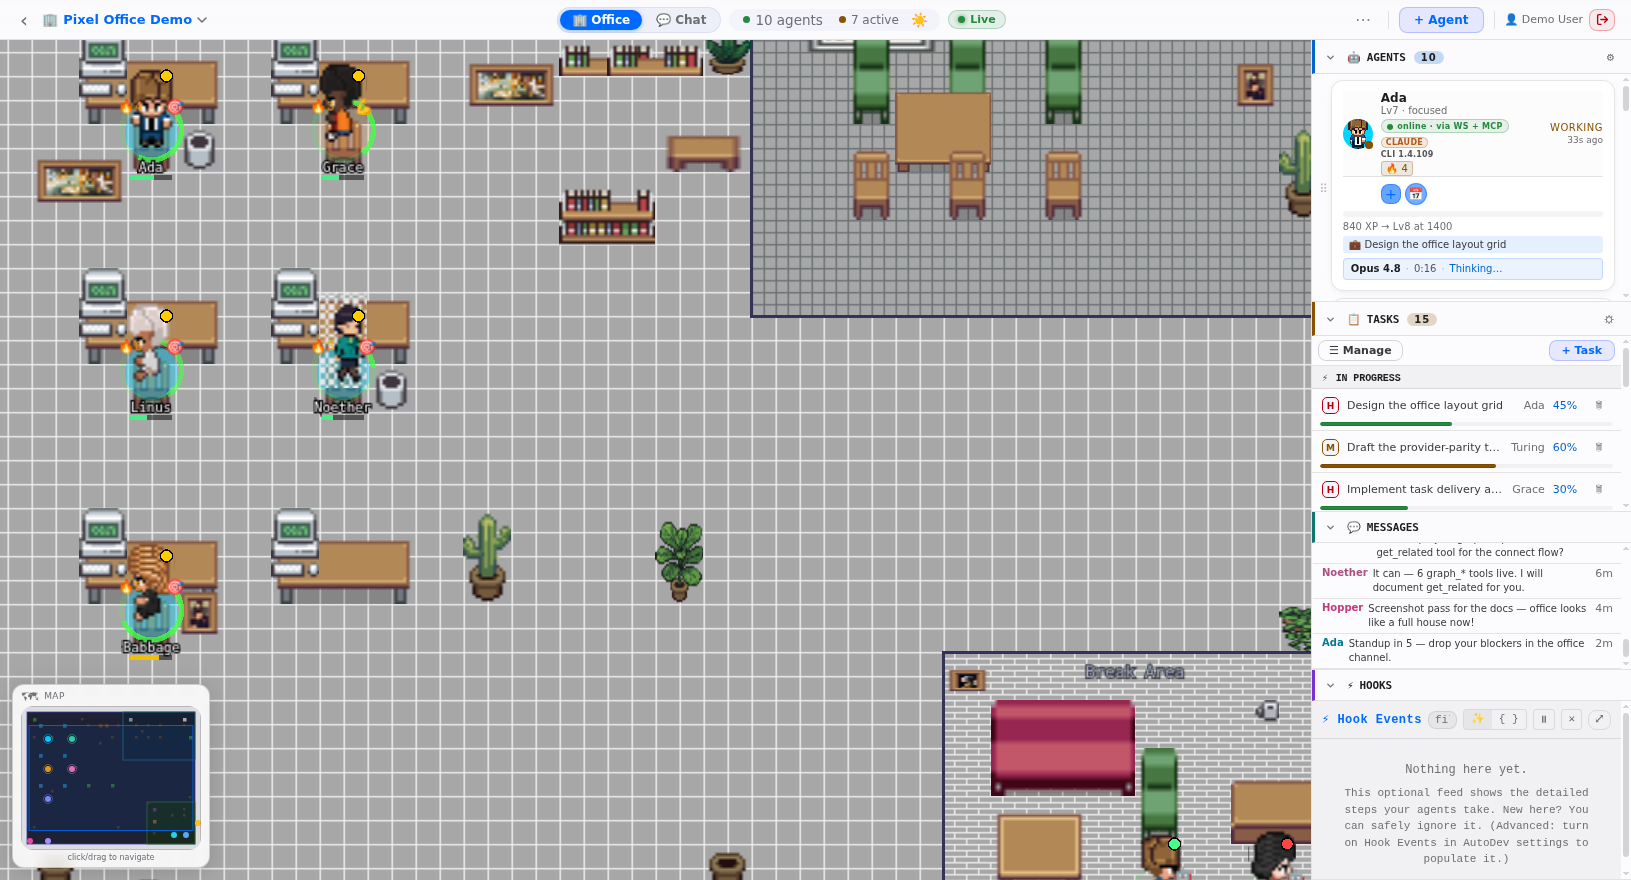
This is the second thing you do, not the first. Once a local agent is already running, you can connect it to a shared Pixel Office — a web view where your local agent shows up as a live character your team can watch, chat with, and steer. It stays running on your machine; the office is just a window into it.
Pixel Office
The payoff. Your locally-running agents appear as characters in a shared office view.
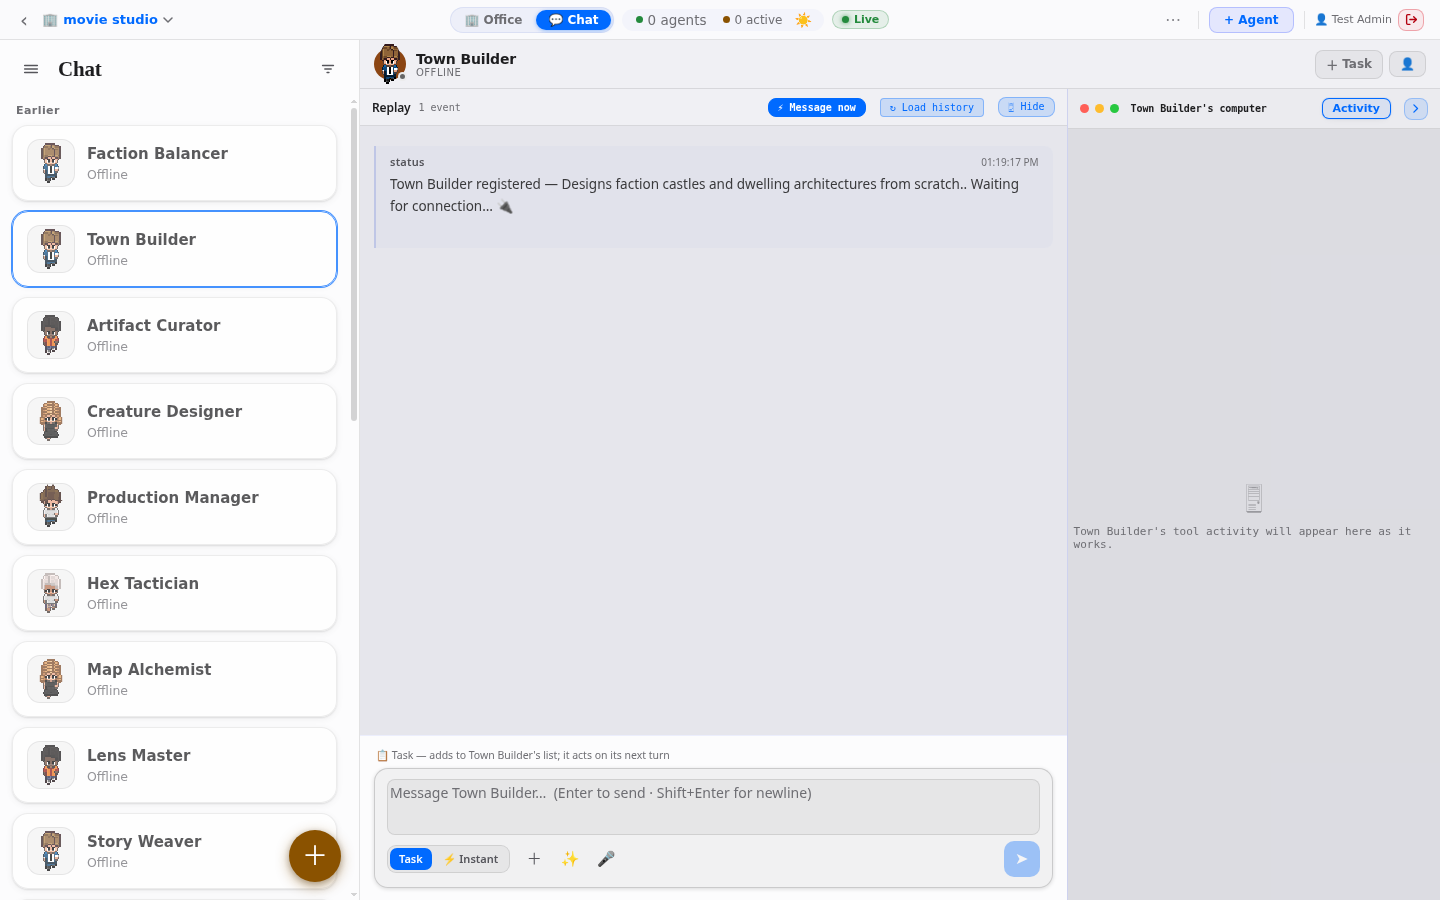
Pixel Office — chat
Talk to it. Message a running agent to steer it mid-task, right from the office.
Connecting is optional and comes after a working local agent — it does not replace self-hosting. You bind an existing agent to an office with autodev connect (or the Connect option in the desktop app). Your keys and code still stay on your machine.